Binarysoft is Authorised Tally Sales & Implementation Partner in India
+91 742 877 9101 or E-mail: tally@binarysoft.com 10:00 am – 6: 00 pm , Mon-Fri
Binarysoft is Authorised Tally Sales & Implementation Partner in India
+91 742 877 9101 or E-mail: tally@binarysoft.com 10:00 am – 6: 00 pm , Mon-Fri
Call CA Tally HelpDesk +91 9205471661, 8368262875

In any business, reports play an important role in giving a view of the business performance. Using reports you can see your daily sales or purchases, profit margins, stock position and so on. Reports help you view details of your day-to-day transactions and are useful for reporting, auditing and filing purposes. In TallyPrime, you can access all such reports and view real-time data based on your transactions, as and when you need.
Working with reports in TallyPrime provides several flexibilities and ease of data analysis.
Find your reports easily: In TallyPrime, reports are organised in such a way that you can access them quickly with minimal effort. Drill down through the Gateway of Tally screen and look for the group that your report belongs to. You can also search and open a particular report at any given point by using Go To feature in TallyPrime.
Navigate in reports with shortcuts: To provide an easy report viewing experience, TallyPrime supports several keyboard shortcuts that are used navigate and perform various frequently used tasks. You can drill down on any line by simply pressing Enter or see the details of a transaction by pressing Alt+F5. Whether you need to select a single or multiple lines, remove/restore lines, or delete a transaction in a report, TallyPrime supports standard, easy-to-use keyboard shortcuts to perform all such tasks.
Configure your reports | Right buttons: Every report in TallyPrime is supported with a set of buttons on the right panel that are commonly used to view additional report details, set the context for the report, and sort the report details based on selected parameters.
For example, you can view your reports for a specific date or period. you can view amounts in base currency, or display the values in a report with a selected factor of number (crores, hundredths, and so on). Similarly, you can include or exclude specific information, such as profit margin, post-dated transactions, and so on, for better analysis of the data.
Export, e-mail, print reports on the fly: In your business, you not only view your business reports, but may also need to share them with others for various reasons like auditing, MIS reporting, or filing your returns. Using TallyPrime, you can export, e-mail, and print your reports as needed.
For example, you can print reports like Reminder Letters and Confirmation of Accounts and share with your parties or keep with you for reference. Similarly, you can e-mail your financial report or voucher reports with your CA for verification and reconciliation.
In addition, TallyPrime supports several application-level, one-time configurations for using these features. This helps you save time and effort from configuring each report separately, unless you need to configure them only for that instance.
In TallyPrime, reports are categorised under specific groups so that you can find the required reports easily. You can open a report through Gateway of Tally or by using the Go To feature. Gateway of Tally helps you progressively navigate to the reports as you drill down. Go To lists all the reports by default in different groups under a common selection table. Using Go To, you can simply type a report name and search the report, without having to move out of the screen you have already opened.
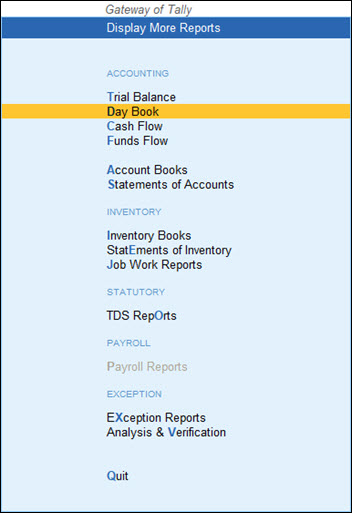
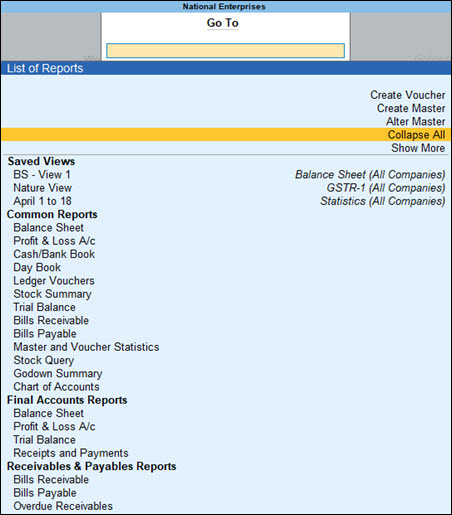
In your business, when you record all your transactions, you will certainly want to view different reports for track the transactions and analyse your business performance. Reports in TallyPrime, by default display your company name, report name, period for which the report is open, and column and rows with specific inputs from your transactions.
For example, to analyse the financial health of your company, you can refer to the financial reports like Balance Sheet, Profit & Loss Statement, and so on. Similarly, the outstanding reports display details of your funds receivables and payables; the cash flow and funds flow reports display the fund projections for your business; and so on.
As you navigate within TallyPrime, all your reports are logically classified based on the report types. Reports like Balance Sheet and P&L Statement are grouped under Final Accounts; Bank Reconciliation and e-Payments are grouped under Banking Utilities; and so on.
What’s more! You can quickly drill-down on each line in a report to explode and view specific details, as part of the same report or in a separate report.
1. Explode/collapse details of a single line entry in the same report: Select a line > press Shift+Enter on the selected line.
You can explode or collapse each line entry in a report to view specific details.
Example:


2. Explode/collapse details of all line entries in the same report: Press Alt+F1 or Alt+F5.
In TallyPrime, you can view the next level of details for all line entries in a report in a single go.
Example: In Day Book, press Alt+F5 (Detailed) to view the next level of data for all the godowns appearing in the report.

3. View next level details in a separate report: Select a line > press Enter.
If you need to view the next level details of a line entry for a report in a different screen, you can do so by pressing Enter on the selected line.
Example: In Godown Summary, press Enter on the selected godown – say Main Location – to view the next level of data in a new screen. For example, if you press Enter on Main Location, the godown Koramangala Godown with other godowns and any additional stock groups will be shown in a new screen.

Upon drilling down to the last level of data (that is the stock item in this case), you can press Enter to open the monthly summary report, as in the case of other summary reports.
To make your reports more handy, TallyPrime supports several keyboard shortcuts that can be used for quick actions within the reports. For example, when you are on Day Book, you may want to quickly add or insert a voucher, create a duplicate voucher entry, or even alter an existing voucher. Similarly, when you are viewing the Stock Summary or Godown Summary, you may want to remove a line showing negative value, and restore it back later. Using keyboard shortcut eliminates the need for moving away from the reports to perform an activity and optimises your time.
Starting Release 2.0.1, you will find all such keyboard shortcuts along with their corresponding actions on the bottom bar of every screen.

In case you want to hide the bottom bar from the screens:
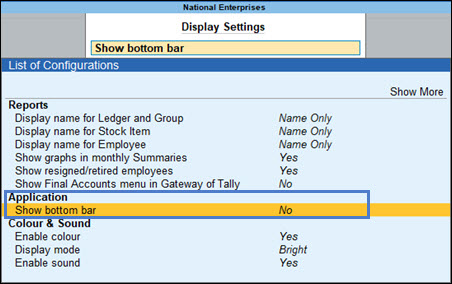
The following are a few examples of the actions that you perform using the keyboard shortcuts available on the bottom bar.
Select one or more lines
On any report
Remove and restore lines
In some reports, you may want to hide some of the lines to understand the details better. For example, you want to view Day Books with all lines except the Order vouchers. You can remove the line temporarily and restore it back in the report.
Similarly, you can perform other actions, such as deleting vouchers (Alt+D), cancelling vouchers (Alt+X), or even quit (Ctrl+Q) the report – all of which are available on the bottom bar.
While viewing any report, you will certainly want to further analyse the report details depending on your business requirements. For example, you may need to see the Balance Sheet based on a specific valuation method, Similarly, you will may want to see the profit made on all sales using the Day Book. You can also switch the context of any report from one company to another to perform specific actions. All such activities can be quickly done in reports using the right buttons.
In TallyPrime, the top three buttons on the right button bar are used to set the context for your reports.

The right buttons in reports enable you to further analyse the report data by sorting, filtering or viewing additional details specific to each report. Whether you want to view the profit-related details in Stock Summary or view ledger-wise Trial Balance, all of these are possible using the right buttons.

Note: In reports, Alt+F5 in the right button bar can be used to view next set of details for a line, similar to using Alt+F1.
You can explore all such activities in different reports using the right buttons, based on your specific business needs.
Additionally, you can also use the following right buttons to configure the values and other details of your report, open specific views and related reports, or view exceptions.
Refer to the following sections for more details.
You can configure the values in your report for that instance, based on different business needs.
Example:
In Day Book, you can display the values based on the Type of Voucher Entries you select.

Similarly, you can view the total values related to Forex Transactions only. Press Ctrl+B (Basis of Values) > Show Forex Transactions only > and press Enter.
You can display the details of a report in different views with additional details or for a specific period. You can also view other reports related to the current report.
Example:
In Stock Summary, you can change the details from Stock Group-wise view to Stock Item-wise view. You can also open related report for the same context of the Stock Summary.

For certain reports, you may want to view the exceptions to better assess the performance of your business. For example, you may have negative ledgers that have an impact on your overall cash or funds flow. Similarly, you may have created certain optional vouchers or post-dated vouchers while recording your day-to-day transactions. You will certainly want to see such vouchers separately as on a specific date. All such details are available as Exception Reports on the right button bar.
Example:
In Day Book
When you view your reports, you would generally configure them based on specific business needs. At the same time, you may need to refer to the same report in regular intervals. If you are using TallyPrime Release 2.0 or later, you can save view of your reports in just a couple of steps. You can not only access the saved views of your reports, you can allow other users too to view and update as you need.
Example:
Your report will start appearing in the list displayed under Go To.
Note that anytime you open the saved view of the report, you will be able to view real-time data for the period of the report you had saved.
For more details, refer to the Save View in TallyPrime topic.
TallyPrime enables you to compare details in a report by displaying details in a new column as per your selected parameters. For example, you can compare stock summary for two different quarters or alter the parameters in the column when needed. You can also display data in repeated columns for based on a selected periodicity. Once you have compared the details as per your requirement, you can delete unnecessary columns.
Example:
In Stock Summary
Each report is supported by a set of configurations that you may require while viewing the details of the report. You can enable or disable the configurations depending on your business-specific requirements.
Example:
In Balance Sheet
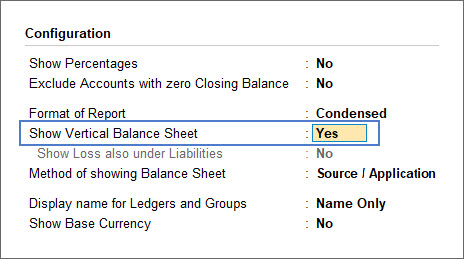
Similarly, you can configure your reports, as needed.
Sharing financial and other business reports with clients and peers is common. Using the Export, E-mail, and Print features in TallyPrime, you can share your reports anytime you need. TallyPrime supports certain one-time configuration for Export, E-mail and Print. These are application-level (global) configurations that will be applied to all your reports anytime you use them. At the same time, TallyPrime provides the flexibility of overriding the global configurations and configuring each report individually using F12 (Configure) and other right buttons. This flexibility helps you do a common setup for your reports for regular use and customise each report as and when needed based on your preferences.
If you regularly export reports for any specific purpose, you can configure the Export process that suits your requirements. For example, you can set the the location of the files, or choose to open the file each time it gets exported. While these configurations are set for all reports, you can override these configurations for each report. refer to the Exporting Data topic for more information.
To share reports via e-mail or send reminder letters to your parties to collect outstanding amounts on time, you can use the E-mail feature in TallyPrime. Similar to Export, you can configure the E-mail feature, such as set up pre-defined e-mail profiles and messages, select the company details that you want to include in the report headers, and the recipient list and so on. Refer to the E-mailing topic for more information.
Printing of reports in TallyPrime is simple. Similar to other features like Export and E-mail, the Print feature helps you to configure the process and also decide the information you want to print on the reports every time. For example, if you need to use a specific printer every time you print or want the company logo to be included in the document, you can set such configurations across all reports (and vouchers). However, based on your preference for certain reports (on or more reports), you can change the print configuration for that specific report to override the common configurations.
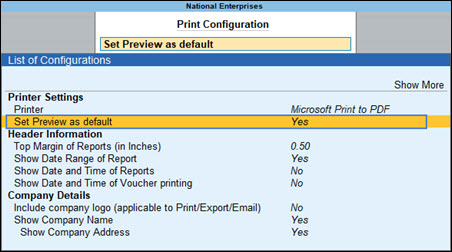
Unlike in earlier releases of TallyPrime, in Release 1.1.4, you can set Preview as the default for all the reports to avoid the possibility of printing by pressing the Enter key by mistake.
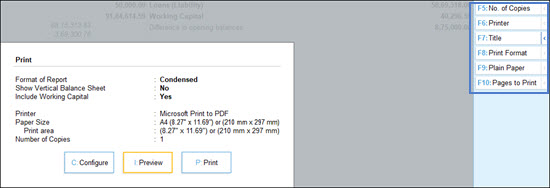
In addition, TallyPrime Release 1.1.4 onwards, you can perform all the immediate print-related activities straight from the right button bar. Activities like changing printer, setting up format or paper type for printing, or updating the title/sub-title of the report will not require you to open the F12 Configuration list anymore.
For more information on Print, refer to Printing in TallyPrime.
Click the following links for some of the frequently used shortcut keys and their use in reports.
Applicable for CAs / Firms Using GOLD (Multi User ) Only
Renew your license now and upgrade from Tally ERP 9 to Tally Prime for Free!₹ 6750 + 18% GST (₹ 1215)
Applicable for CAs / Firms Using GOLD (Multi User ) Only
Renew your license now and upgrade from Tally ERP 9 to Tally Prime for Free!
₹ 12150
+ 18% GST (₹ 2187)

Unlimited Multi-User Edition For Multiple PCs on LAN Environment
Renew your license now and upgrade from Tally ERP 9 to Tally Prime for Free!₹ 13500 + 18% GST (₹ 2430)
Unlimited Multi-User Edition For Multiple PCs on LAN Environment
Renew your license now and upgrade from Tally ERP 9 to Tally Prime for Free!
₹ 24300
+ 18% GST (₹ 4374)

Single User Edition For Standalone PCs ( Not applicable for Rental License )
Renew your license now and upgrade from Tally ERP 9 to Tally Prime for Free!₹ 4500 + 18% GST (₹ 810)
Single User Edition For Standalone PCs ( Not applicable for Rental License )
Renew your license now and upgrade from Tally ERP 9 to Tally Prime for Free!
₹ 8100
+ 18% GST (₹ 1458)

Tally On Cloud ( Per User Annual)
Now access Tally Prime anytime from anywhere – Just Deploy your Tally License and Tally Data on our Cloud Solution.₹ 7000 + 18% GST (₹ 1260)
Unlimited Multi-User Edition
For EMI options, please Call: +91 742 877 9101 or E-mail: tally@binarysoft.com (10:00 am – 6: 00 pm , Mon-Fri)₹ 67500 + 18% GST (₹ 12150)
Unlimited Multi-User Edition For Multiple PCs on LAN Environment
Renew your license now and upgrade from Tally ERP 9 to Tally Prime for Free!₹ 45000 + 18% GST (₹ 8100)
Single User Edition For Standalone PCs
For EMI options, please Call: +91 742 877 9101 or E-mail: tally@binarysoft.com (10:00 am – 6: 00 pm , Mon-Fri)₹ 22500 + 18% GST (₹ 4050)
(Per User/One Year)
TallyPrime latest release pre-installed₹ 7200 + 18% GST (₹ 1296)
(Two Users/One Year)
TallyPrime latest release pre-installed₹ 14400 + 18% GST (₹ 2592)
(Four Users/One Year)
TallyPrime latest release pre-installed₹ 21600 + 18% GST (₹ 3888)
(Eight Users/One Year )
TallyPrime latest release pre-installed₹ 43200 + 18% GST (₹ 7776)
(Twelve Users/One Year)
TallyPrime latest release pre-installed₹ 64800 + 18% GST (₹ 11664)
(Sixteen Users/One Year)
TallyPrime latest release pre-installed₹ 86400 + 18% GST (₹ 15552)